Flanders 1917 (part 2): victory to defeat
Posted By Peter Pedersen on October 6, 2017 @ 11:00
The three great attacks by the British Second Army in Flanders—on the Menin Road on 20 September 1917, at Polygon Wood six days later, and at Broodseinde on 4 October—revived the Third Ypres offensive after the Fifth Army’s failures in August. Spearheading each attack, ANZAC divisions gained much of the ridge around the southern half of the Ypres Salient, denying the Germans the views over the Salient they had enjoyed since 1915.
Confounded by the British ‘bite and hold’ tactics, the Germans were desperate. Their ‘elastic defence’, with its lightly held front line and counterattack formations ready to smash the British advance when it lost momentum, hadn’t worked. The British advance stopped before running out of steam. Reverting to a strongly held front line invited destruction from the British artillery. Major-General John Monash, the 3rd Australian Division’s commander, wrote: ‘Great happenings are possible in the very near future as the enemy is terribly disorganised.’
Monash’s optimism notwithstanding, the terrain now favoured the enemy. From Passchendaele, on the end of the ridge, the Bellevue Spur curved round to parallel the ridge on the far side of the Ravebeek valley. As an assault along the ridge towards Passchendaele would be shot up from the spur, both had to be struck simultaneously. Passchendaele was therefore to be captured in two stages, the first, on 9 October, reaching the outskirts, and the second, three days later, taking the village.
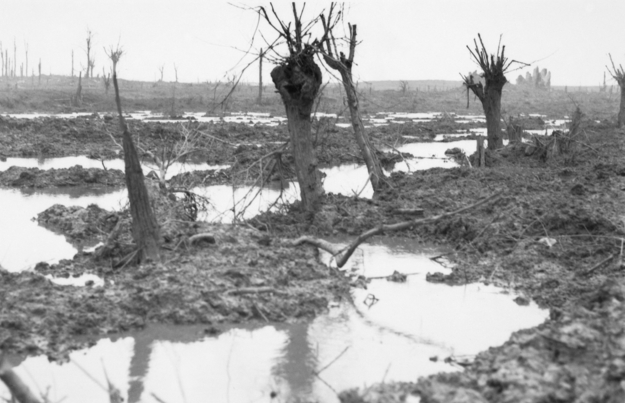
Reinforcing the Germans’ terrain advantage, drenching rain, which had fallen throughout August, did so again, returning the battlefield to a quagmire. Confident that the strongest defences had been breached and the Germans were about to fold, the commander-in-chief, Field Marshal Sir Douglas Haig, disregarded advice from his senior commanders to end the campaign.
II ANZAC had the main role in the 9 October attack, which its two British divisions, the 49th and the 66th, carried out. Though the advance, about 1.4 kilometres, was about the same as in previous attacks, the conditions were much worse. Yet only four days were allowed for preparation, as against seven for Broodseinde. Consequently, only 25 guns, a fraction of the normal number, could support the attack.
The 49th Division made little headway on the Bellevue Spur and only part of the 66th reached Passchendaele before being driven back. Supposed to secure the right flank, the 5th and 6th Australian Brigades were exhausted from labouring tasks in the dreadful weather. They still reached their objectives, but, with an average battalion strength of 157 men, were too weak to hold them. Only on the left, at Poelcapelle, were some minor gains made by the Fifth Army.
Despite the setback, there was no question of abandoning the 12 October attack. Advancing along the ridge, the 3rd Australian Division would take Passchendaele, while the New Zealand Division struck Bellevue Spur. To give them a chance in the mud, the creeping barrage had to be slower. With only three days for preparation, getting the necessary extra shells forward was impossible. Even had it been otherwise, the bogged guns could only have fired a fraction of them.
The 1.6-kilometre advance was based on reports that the 66th Division had only withdrawn to its first objective, 550 metres past its start line, on 9 October. Next day, it was found to have pulled back all the way to its start line. The 3rd Division would have to attack from there, extending its advance to 2.2 kilometres, easily the longest yet and in the worst weather. ‘Bite and hold’s’ key principle, a small ‘bite’ well within the attacking infantry’s capability, had been dumped. A longer advance also meant a weaker supporting barrage.
A message from Lieutenant-Colonel Leslie Morshead, commander of the Australian 33rd Battalion, summarised the outcome: ‘Things are bloody, very bloody.’ The creeping barrage resembled a few pebbles plopping into mud. On the Bellevue Spur, the New Zealanders were annihilated, enabling the Germans there to flay the 10th Australian Brigade as it struggled through the waist-deep mud of the Ravebeek. About 20 men briefly reached Passchendaele. The 9th Brigade was stopped short of it and withdrew, as did the 12th Brigade protecting its right.
The New Zealanders lost 2,800 men, making 12 October the costliest day in their military history, and the 3rd Australian Division 3,199 men. Overall, the Third Ypres campaign cost the Australians 38,000 men, though this was spread over their eight-week involvement and not just the four big attacks they carried out. All but one of those attacks hit the Germans hard, stretching their morale and resources and gaining valuable ground, at least by Western Front standards. Whether those results justified the cost depends on one’s point of view.
As Haig sought a winter line that was not under German observation from the Passchendaele end of the ridge, the offensive continued even though the Broodseinde success had given the British observation over much of the German line. The Canadian Corps took over the advance. After five ‘bite and hold’ attacks between 26 October and 10 November, it did what II ANZAC had been ordered to do in one attack and finally captured Passchendaele. By then the battle had acquired an infamy that time has not diminished. ‘I died in hell. (They called it Passchendaele)’, wrote Siegfried Sassoon.
Article printed from The Strategist: https://www.aspistrategist.org.au
URL to article: https://www.aspistrategist.org.au/flanders-1917-part-2-victory-to-defeat/
Click here to print.