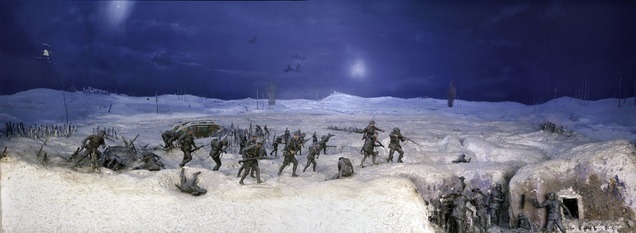
Flares, shell-bursts and burning tanks bathed the snow-covered battlefield in a surreal light as the 4th Australian Division attacked the Hindenburg Line near Bullecourt in the early morning darkness on 11 April 1917. Dense barbed wire loomed. The tanks should have crushed it. ‘Come on boys, bugger the tanks’, yelled Major Percy Black. They were his last recorded words. Already a legend in the Australian Imperial Force, Black was killed while leading his men through the entanglements.
Forming part of the British Fifth Army, the Australians and the British 62nd Division were supporting a British offensive at nearby Arras that was intended to distract the Germans from a massive French offensive to the south. General Sir Hubert Gough, the Fifth Army’s commander, had a reputation for impetuosity that the prelude to the attack fully justified. Told just beforehand that the artillery had barely damaged the wire, he decided instead to use tanks to create paths through it.
Tanks had shown promise during the Somme offensive in 1916, but the Australians had never worked with them. Their commanders protested, but were overruled. They didn’t know that the tanks allotted were clapped-out. Moreover, the usual supporting artillery barrage was dispensed with so as not to impede them. In the event, the tanks arrived late and then most broke down or were soon knocked out.
Braving murderous fire, the Australians advanced nonetheless. Those who got through the wire and into the Hindenburg Line were quickly isolated. They had to withdraw just after midday, having lost almost 3,500 men, including 1,182 prisoners, the most Australians captured in one action during the war. As Bullecourt had not fallen, the 62nd Division stayed put. The British Army later used First Bullecourt as an example of how not to undertake an attack.
Gough and the tanks wore most of the blame. His last-minute decision to use them amounted to an experiment and made for rushed preparations. According to the Germans, some Australian prisoners couldn’t even name the location of the attack. To a man, the Australians condemned the tanks. They would have nothing to do with them until improved models appeared in 1918.
Yet the Australian commanders were not entirely blameless. During the battle, Black’s great mate, Major Harry Murray, sent a message back stating that with artillery support, the position could be held. Reinforcing his plea, numerous signal rockets calling for artillery support were fired.
None came. Deceived by the blanket of snow, which hid the lie of the land, the Australian artillery observers wrongly thought the advance had reached the area beyond the Hindenburg Line that Murray wanted shelled. The senior Australian commanders chose to believe them, ignoring Murray—who had just been awarded the Victoria Cross and would become the most highly decorated infantryman in the armies of the British Empire—and the stream of signal rockets.
With the French faltering after their offensive was smashed, the British continued the Arras battle to encourage them. On 3 May, the 2nd Australian Division attacked over the same ground as the 4th had done three weeks earlier. This time the preparations were thorough and an artillery barrage was included in place of tanks.
Even so, the assault got off to a shaky start. Bunching up after veering off line, the 5th Brigade on the right was flayed. The survivors broke. As the 5th’s commander was in his headquarters 1.5 kilometres rearwards, he couldn’t have intervened even if he’d known what had happened.
The neighbouring 6th Brigade had reached the Hindenburg Line, but its flank was now dangerously exposed. Brigadier General John Gellibrand, the 6th’s commander, had set up his headquarters in the old Australian front line and saw everything. He shored up the threatened flank by rallying what was left of the 5th Brigade and ordered a protective barrage around the stretch of the Hindenburg Line his own brigade held.
Gellibrand had also seen the British 62nd Division’s attack on the left flank shattered, but couldn’t convince his divisional commander, Major General John Smyth VC, whose headquarters was five kilometres rearwards. Swallowing the 62nd’s assurance that it was ‘bombing towards the Anzacs’, Smyth ignored Gellibrand’s protests and ordered an attack specially to help them. It was shredded.
As the fighting swayed back and forth, the 1st Australian Division relieved the 2nd and then handed over to the 5th. Attack was immediately followed by counterattack, the Germans sometimes using flamethrowers. After a fortnight they tossed in the towel. The British took Bullecourt and the Australians linked up with them.
Field Marshal Sir Douglas Haig, the British commander-in-chief, praised the Australian capture of the Hindenburg Line near Bullecourt as ‘a most gallant feat of arms’. In fact, it was the Australians’ finest feat on the Western Front to date. The 27th Wurttemberg Division also fought brilliantly. Having seen off the 4th Australian Division, it then took on the 1st, 2nd and 5th Divisions.
Second Bullecourt cost the Australians 7,000 men. The Germans could have been speaking for them when they said that it was a more ferocious battle than the Somme had been. For the Australians, death on the Somme was mainly dispensed at long range by artillery; at Bullecourt, it came at close quarters. But the failure of commanders to grant their subordinates authority in keeping with their better grasp of battle conditions unnecessarily cost Australian lives in both Bullecourt battles.
 Print This Post