In August 1918, the battlefield of the Western Front was something that no soldier there had yet experienced. For the first time in three and a half years, movement had been restored to the battlefield. Following the Battle of Amiens on 8 August, the Allied forces inexorably pushed the German Army back—an army that was badly demoralised and weakened by its recent offensives, but one with the advantage of being in strong defensive positions, and one ordered to hold its ground once again.
The men of the Australian Corps, having been part of the spearhead of the infantry attack at Amiens, continued to grind their way along the Somme Valley, forcing the Germans out of trenches and villages, across plains and marshes. By the end of the month the fortified town of Péronne nearby Mont St Quentin stood in the way of the 2nd Australian Division.
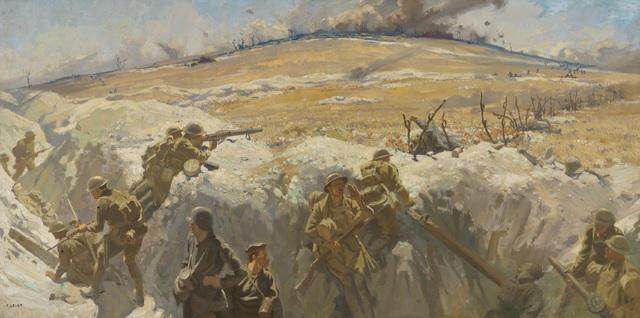
The small, round dome of Mont St Quentin is hardly a notable feature of the landscape, but its small height gave its occupants a sound advantage in visibility and range of fire, and it was the key to Péronne. The Australian brigade that faced it, the 5th, was astonishingly understrength. The four battalions together totalled a little over 1,300 men—not even one and a half full-strength battalions. The men were already exhausted, having advanced nearly four kilometres and cleared the village of Cléry-sur-Somme in the previous 48 hours. There were reports of non-commissioned officers almost asleep on their feet even while directing their own men.
There was no particular obligation on Lieutenant General John Monash to use his already weary corps to capture Mont St Quentin or Péronne. He had been ordered to simply keep touch with the enemy. However, given Field Marshal Sir Douglas Haig’s stated opinion that it was time to take risks, he considered he had enough scope to undertake an operation to capture Mont St Quentin before pressing on to Péronne itself. His direct commanding officer, General Sir Henry Rawlinson of the Fourth Army, was doubtful it could be done but allowed the move all the same. Orders were issued to battalion and company commanders just hours before the operation was to go ahead.
The precariousness of the situation cannot be emphasised enough. Constant nibbling away at the German line and the general movement forward not only had worn out the attacking force, it had stripped the infantry from much of its overarching firepower. There was no time to organise a solid creeping barrage to precede the men across no-man’s-land, in part because much of the artillery was still trying to get across the river. Mont St Quentin was going to be attacked by a weakened force of a few hundred men, with minimal firepower at their disposal and a plan to rush German strongpoints while ‘screaming like bushrangers’ to achieve their objective.
Nothing about this was familiar. The Australian infantry was well experienced in the art of trench warfare and the comforting wrap of firepower protecting their every move. And yet they understood their craft, and even with little warning were able to pull together an effective attack. Three badly depleted battalions launched their attack at 5 am on 31 August 1918, and captured the heights in less than two hours.
With only light artillery bombardments to help, the men substituted firepower of their own, using rifle grenades to fire a kind of ad hoc creeping barrage in front of them as they advanced. Company commanders kept tight control on the battle, with at least one breaking the plan to provide flank support after recognising the right was in danger. Others organised parties to deal with German strongpoints with rifle grenades, bombs and machine guns to keep the line moving forward as seamlessly as possible.
At around 6 am, company commanders of the 19th Battalion saw a German counterattack forming, and used trench mortars, Lewis and Vickers guns, and rifle fire to break up the massing infantry. This was old-fashioned warfare being controlled from the midst of battle in a manner that was not possible in timed set-piece operations. It took determination, courage and an enormous degree of professionalism on the behalf of the Australian infantry to capture Mont St Quentin.
Henry Rawlinson woke to the news that the Australians had captured the key to Péronne. He recorded in his diary that he heard the news that ‘the Australians had taken Mt St Quentin! … I was overjoyed. It is indeed a magnificent performance and no praise is too high for them.’
Although the weak garrison was pushed off the crest of the mount later that day, the heights were swiftly recaptured. More importantly, control of Mont St Quentin allowed the remainder of the Australian Corps to sweep into Péronne, and opened the way to the Hindenburg Line, the last great German defensive position on the Somme.
This operation, sometimes called the finest achievement of the AIF (with some merit), was not without its cost. The already seriously depleted 5th Brigade fought continuously for four days, advancing more than seven kilometres and capturing nearly 1,000 Germans, 79 of their machine guns and a number of trench mortars. In the single operation of 31 August, however, the brigade lost 17 officers and 366 other ranks to the casualty list. Its four battalions no longer had enough men between them to constitute a single full-strength battalion. Success at Mont St Quentin was stunning, and a valuable contribution to the advance, but it nearly cost the 2nd Australian Division everything it had.